Creating a new Host within the Icinga 2 configuration files is fairly easy. Basically you only have add an object of the type “Host” to a config file and reload Icinga 2. Doing the same with Icinga Director is even easier, you don’t even have to bother with terminal editors and configuration files. However, what sounds so easy for an experienced user may not be so obvious for beginners. Today I’m going to show you how to monitor your first host with Icinga, by using Icinga Director for configuration.
Icinga 2 comes with a very powerful configuration language. It allows you to create simple monitoring objects but also very dynamic rules and functions to build flexible configurations. The Icinga Director is an extension for Icinga that brings these configuration capabilities to the Web interface of Icinga. With Icinga Director you can create, modify, deploy and track configuration changes in your web browser.
Requirements
If you don’t have it already, you should start with a basic Icinga Stack. We’ve put together a quick guide how to setup your first Icinga on our Get Started page. If you’re not familiar with the basic concepts of Icinga I would recommend to first read about our Monitoring Basics.
For an easy start we recommend at least 2 GB of RAM, 2 or more cores, CentOS for the operation system, an Apache web server and MySQL as a database.
- Follow the Icinga 2 installation instructions. Icinga 2 executes monitoring checks and collects the results.
- Install Icinga Web to display the collected data.
- Install Icinga Director to manage you configuration through the web interface.
During the initial setup of Icinga Director you will be asked to run an initial import (Run Import). This means that Icinga Director will create a connection to your Icinga 2 daemon and import definitions of CheckCommands that are already available.
The result of the initial import are a several hundred command definitions that are now available in Icinga Director. You’ll see each of those commands in the Director’s activity log waiting to be deployed. Hit the “Deploy” button to finish the setup.

“Deploying” means Icinga Director will send the configuration to Icinga 2. The configuration will automatically be verified and Icinga 2 will be reloaded if no errors are found. You can track and see the details of deployments in the “Deployments” tab.
Host Templates
When installing Icinga 2 it comes with some default configuration which includes some basics to get started easier. This default configuration includes some basic templates and some standard checks, so your Icinga won’t be completely empty after the first start. Icinga Director does not come with this default configuration. (Besides the command definitions you imported during the initial Director setup.)
This means that you have to do some preparation before you can add your first host with Icinga Director. There’s not much work to do, though. Before adding your first host you need to create a host template.
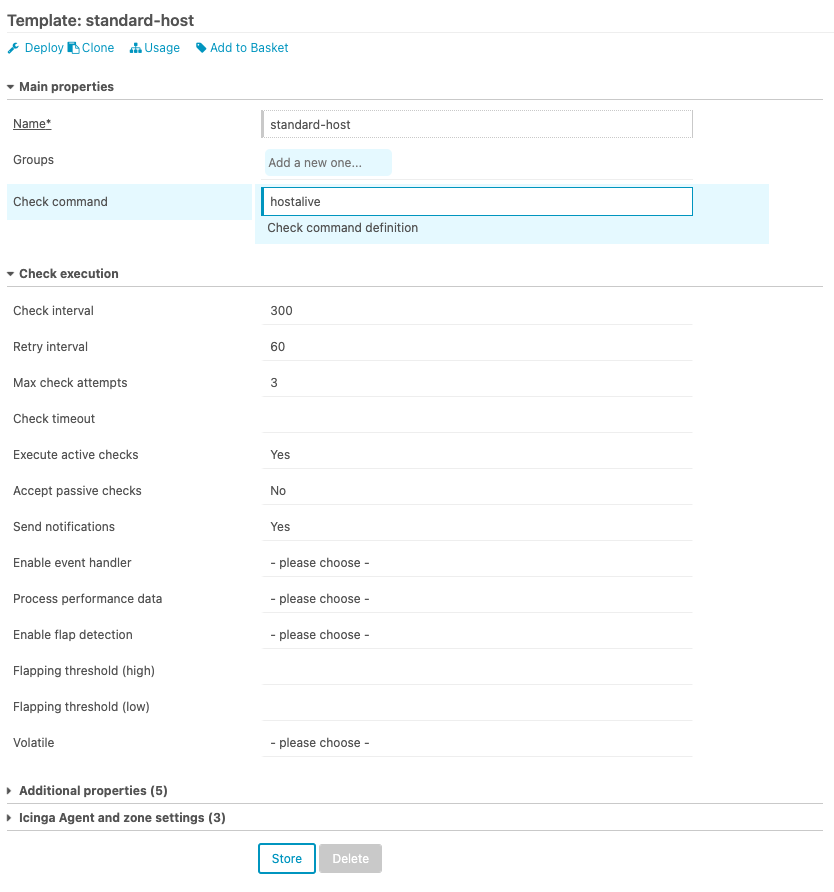
The host template includes some basic parameters such as:
- Check command: Defines how to check the availability of a host. We use the `hostalive` check command which is the default for Icinga.
- Check interval: Defines the interval in which the check is executed
- Retry interval: Defines the interval in which to retry the check before marking it as a “hard state”
- Execute active checks: Actively execute the checks and don’t wait for check results provided by third party tools or scripts
- Accept passive checks: Ignore check results provided by third party tools or scripts, only the checks executed directly by Icinga 2 are relevant
- Send notifications: Enable notifications for hosts using this template
Your first Host
Finally adding your first Host via Icinga Director is the easiest part, once all requirements are met and a template is available. There are some parameters that you have to fill in such as a host name, address and of course which host template to use.
Once the host template and host are created you are ready for your first deployment! You’ll see the changes you made in the Activity Log. That’s where you can track all changes made in detail. Not only those made by you, but also changes made by your team are visible here.
Hitting the “Deploy” button will send your changes to Icinga 2 and they will become available in the host overview. Icinga will start executing the checks in the defined interval and display the results in your web interface.
Check out our Webinar Icinga Director for Practitioners
Get a visual tour of Icinga Director: Its architecture, data imports, change tracking, and automation hooks. Register for the free session on 02 December 2025, or watch the recording afterward.
Explore other Features of Icinga Director
Adding your first host is only the beginning. You can continue your journey of learning how to master Icinga Director through many different topics. For example, adding new service checks to your hosts is very similar to adding a host. Still, there are plenty of capabilities included in Icinga Director that are worth exploring. Here are some examples to continue reading:
- Learn more about the fundamentals of Icinga Director: How your configuration gets rendered
- Use Icinga’s dynamic rule based configuration for service checks: Working with Apply for rules – tcp ports example
- Use Icinga Director to manage and deploy Icinga Agents on your machines: Working with Agents and Config Zones
- Automate your process by importing data from third party databases: Import and Synchronization