The ability to log into all corporate applications with one username and password is pretty convenient, even compared to a password manager. As a benefit, the IT department can centrally enforce one desired two-factor auth mechanism. Now we, Icinga, also provide a so-called OpenID Connect integration for single sign-on. By the end of this text you’ll know how to connect your Icinga Web instance to the ID provider of your choice.
Icinga Web SSO 101
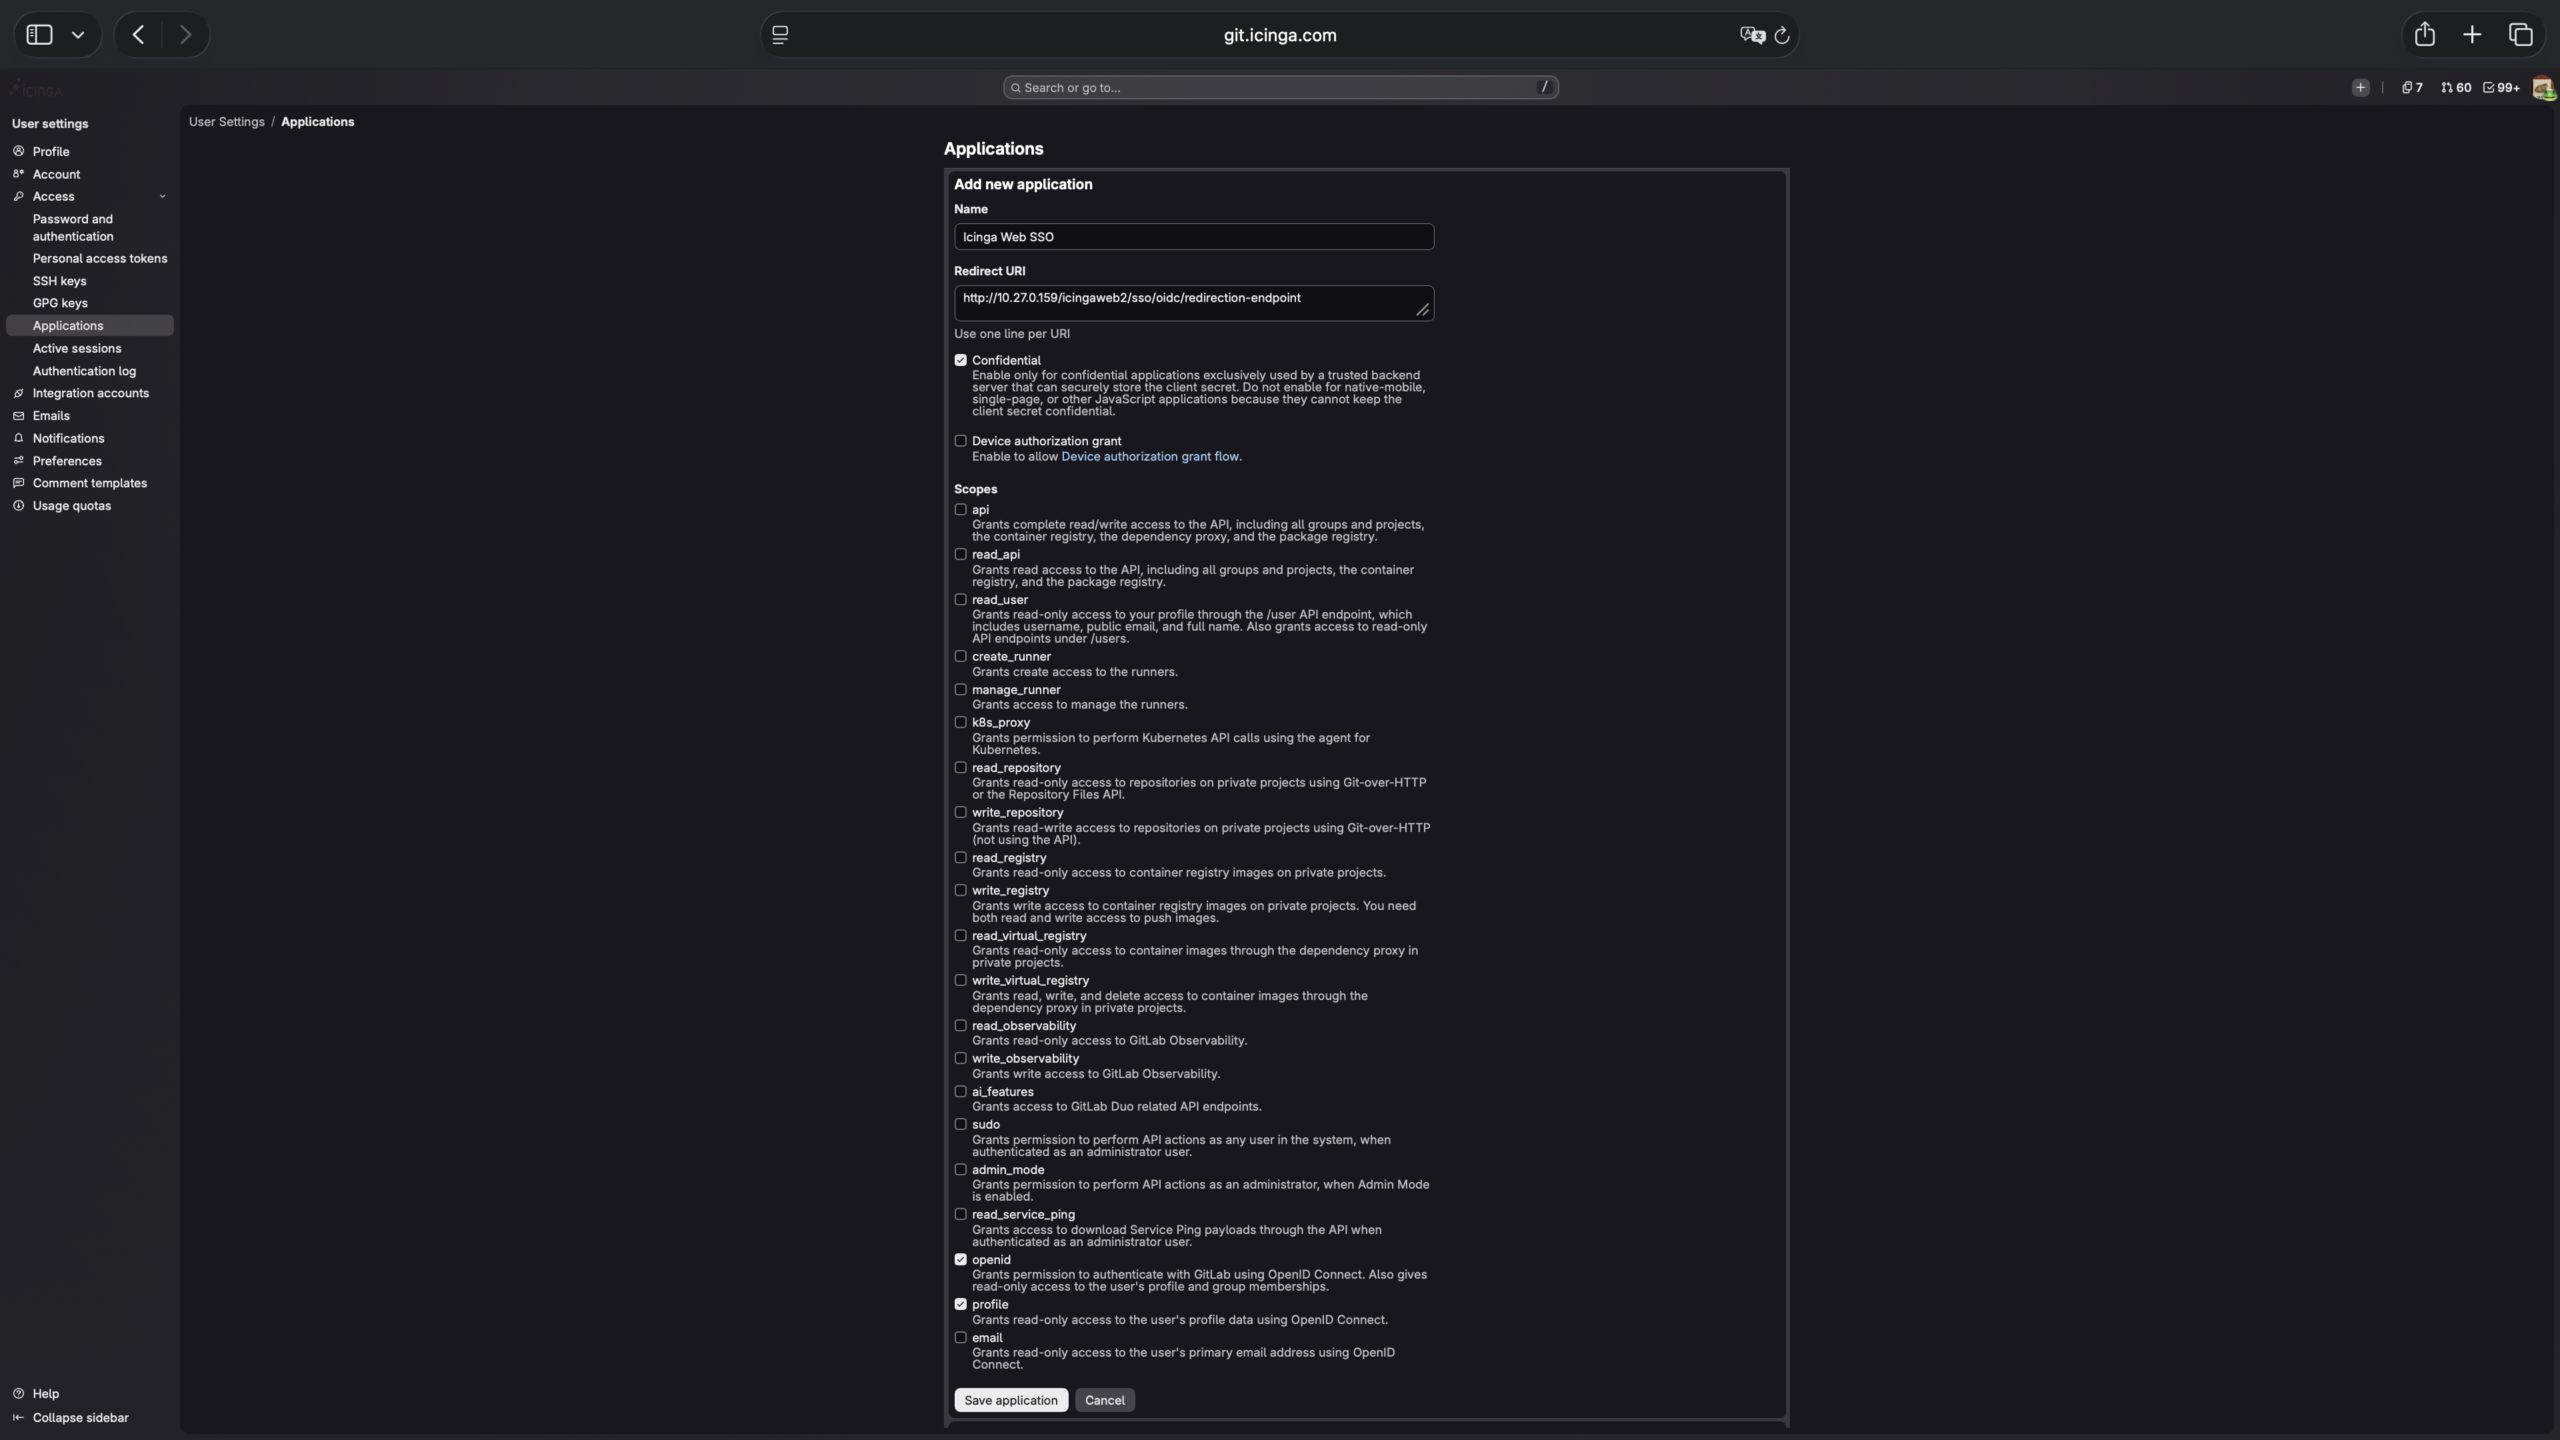
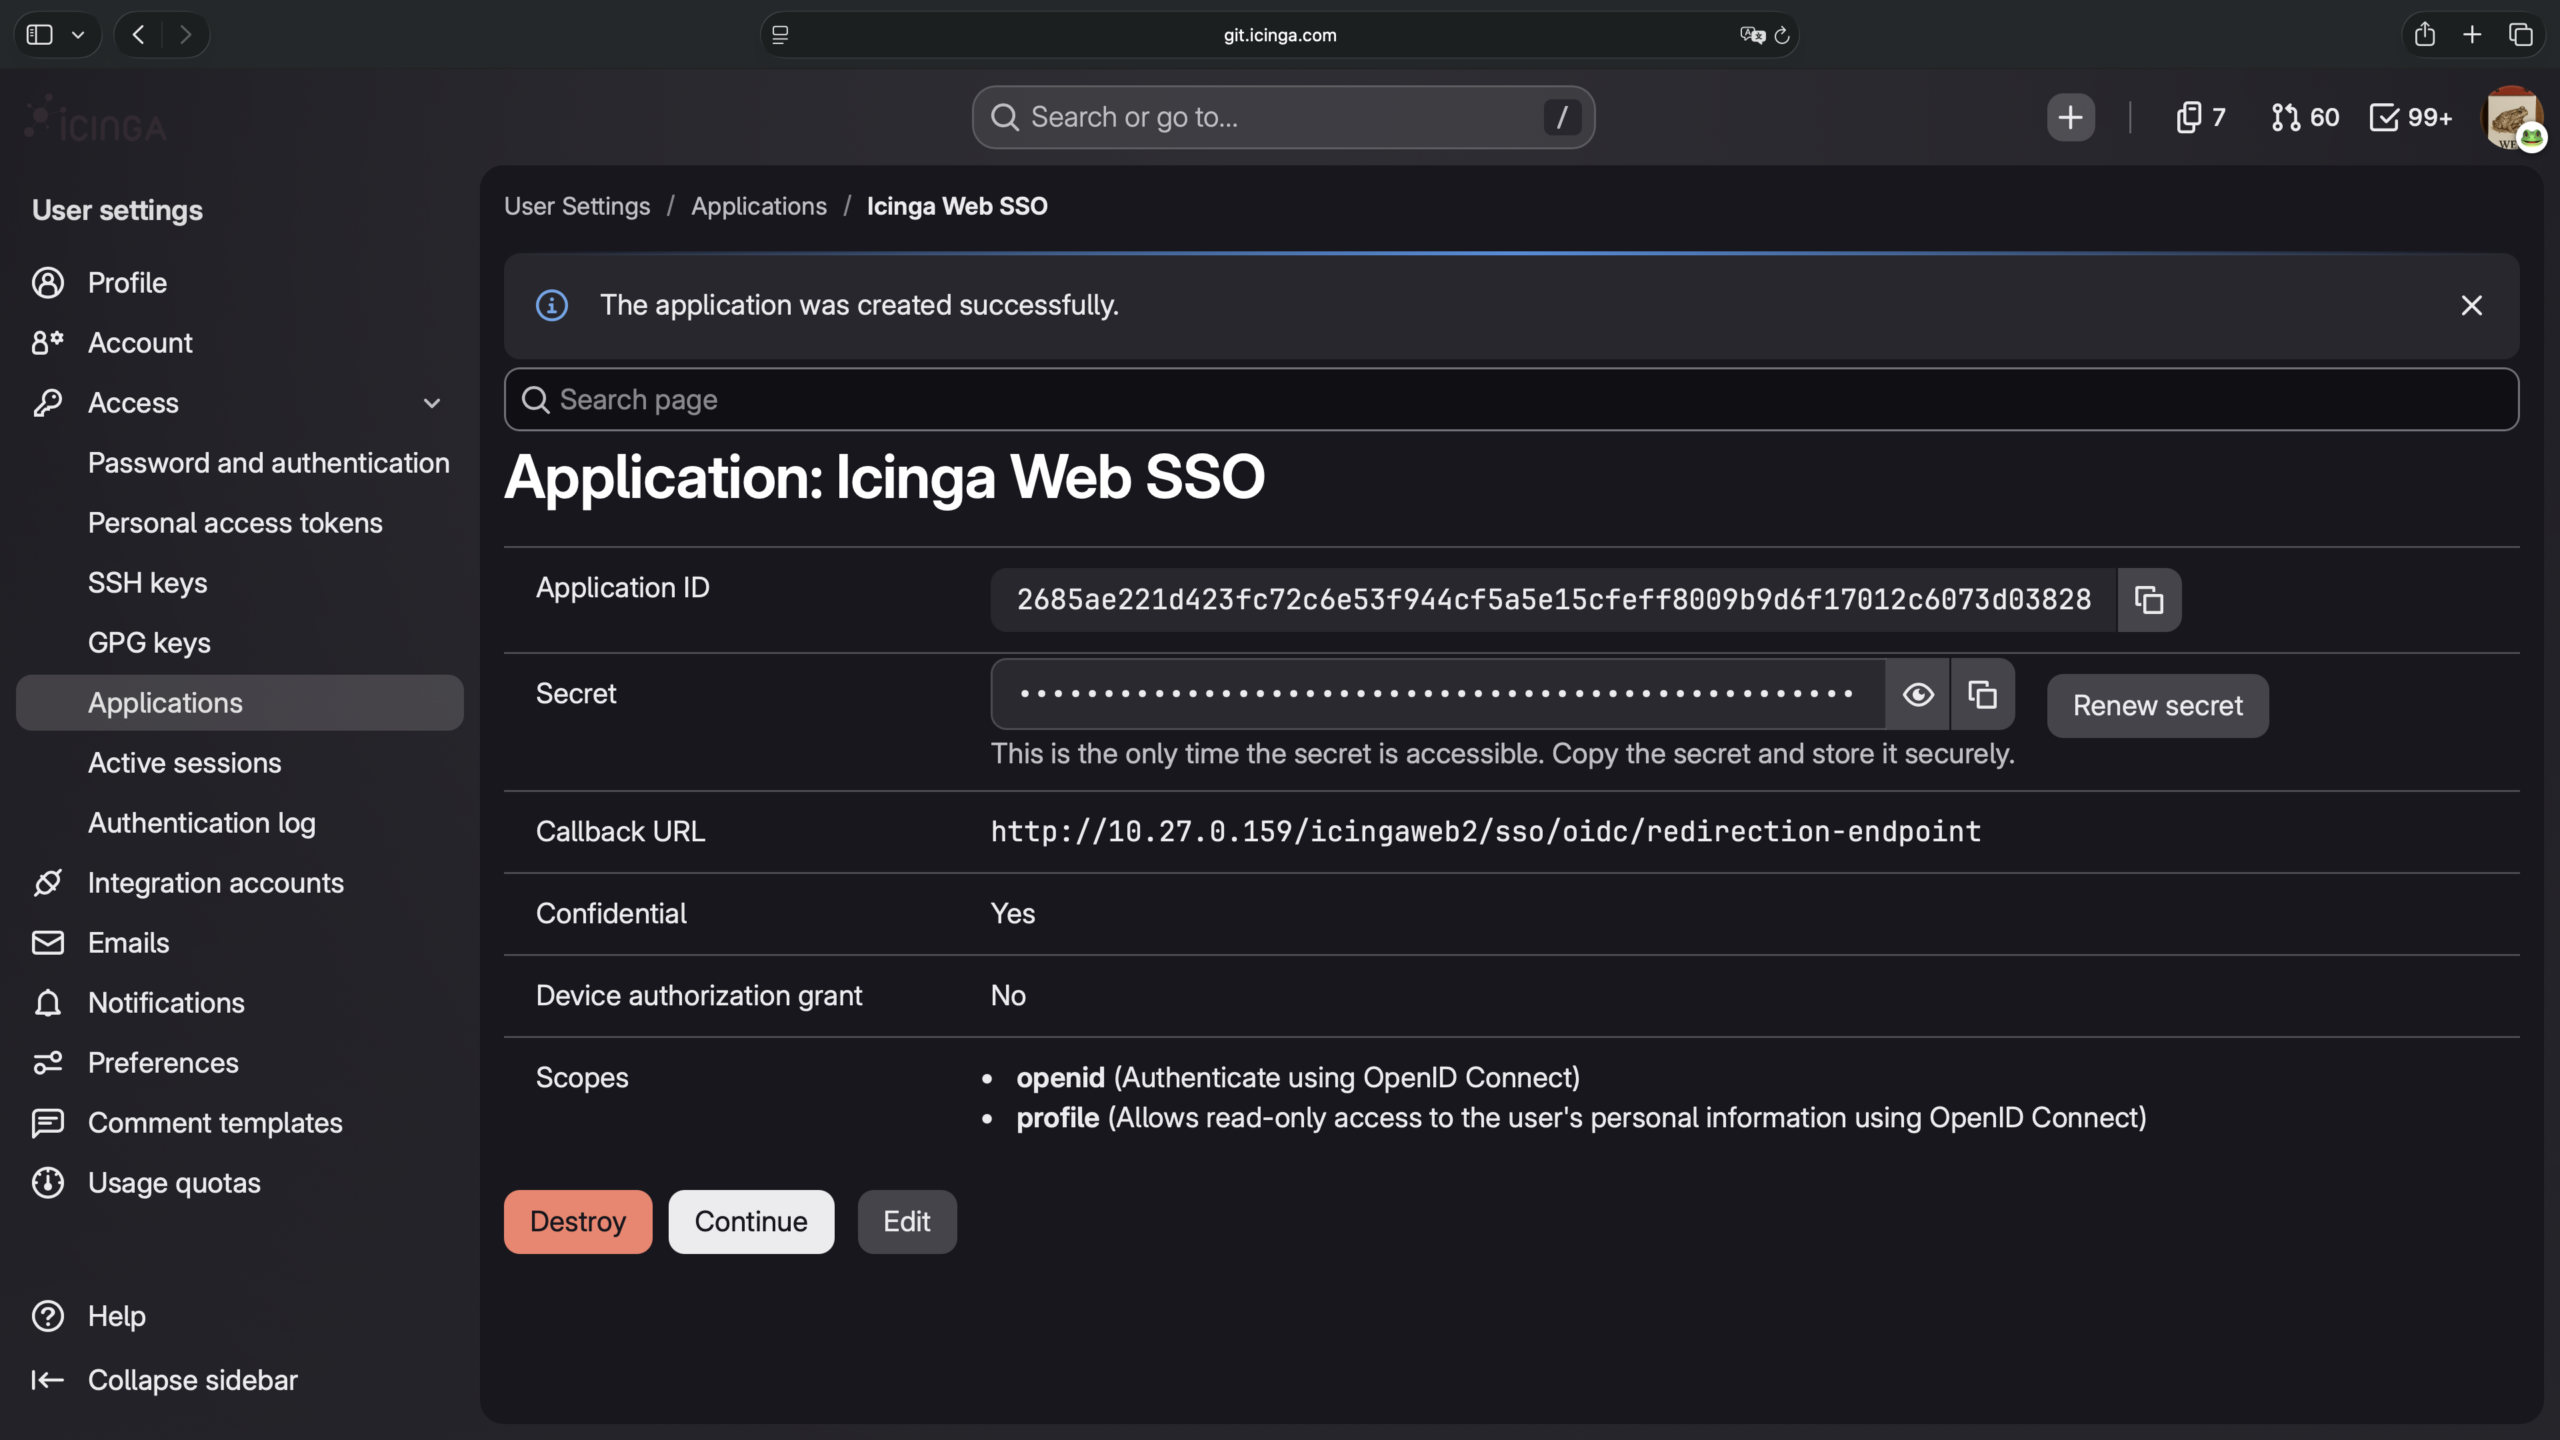
Given your Icinga Web is already up and running, install the icinga-sso-web package from our usual repository. It should enable the “sso” module automatically, but feel free to check [⚙] > Modules in Icinga Web. While on it, navigate to sso > Providers. Here we list the OIDC identity providers you can login with. We explicitly support multiple ones, after all popular sites also allow logging in with Google, Facebook, GitHub, etc. Start creating your first provider via “+ New”. Ideally, also add Icinga Web on the provider side in parallel. In my case it’s our GitLab, so I’ve opened its applications settings in a new tab: (profile picture) > Preferences > Access > Applications > Add new application.
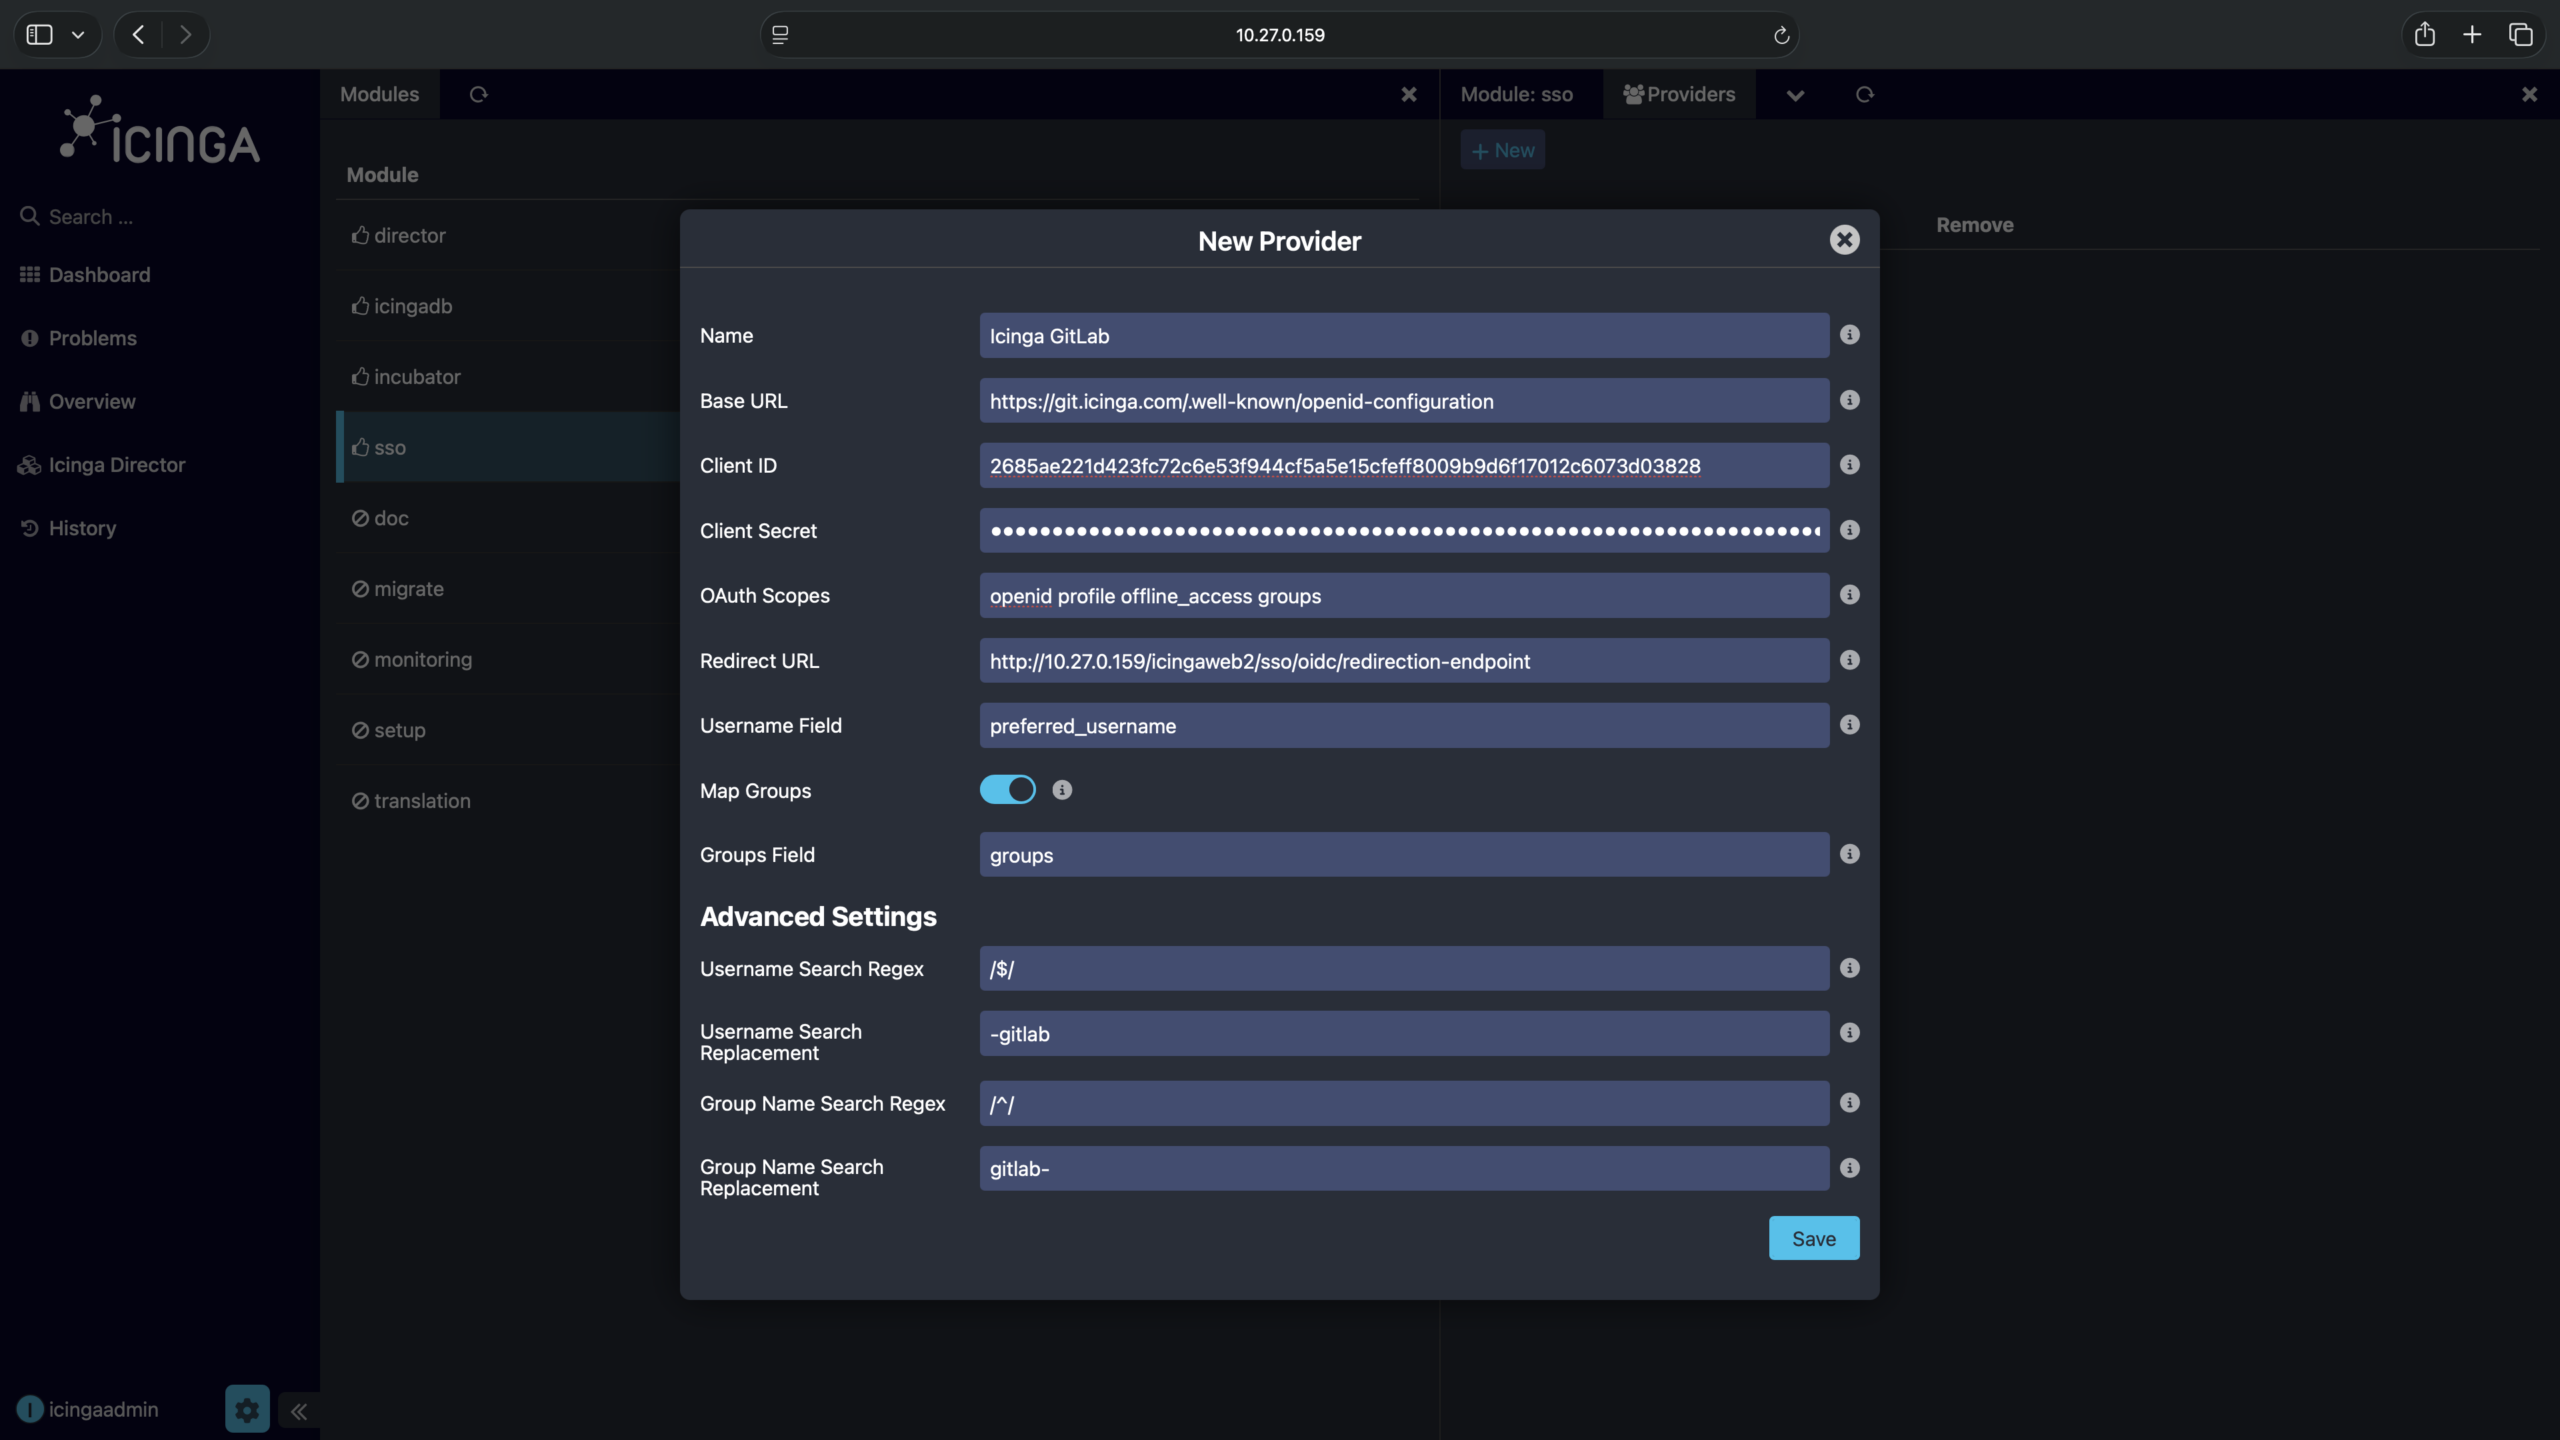
Both dialogues require a name. In Icinga Web SSO, I specified “Icinga GitLab” which will show on the login button later. In GitLab, of course, I entered “Icinga Web SSO”.
Next, Icinga Web SSO requires a URL to discover all kinds of data about the Icinga GitLab. Some identity providers tell you the URL explicitly, some imply their root URL plus “/.well-known/openid-configuration”, in my case “https://git.icinga.com/.well-known/openid-configuration”. In any case, the URL ends with “/.well-known/openid-configuration”! Don’t hesitate to open it in a browser to verify it returns some JSON.
Apropos URL, the identity provider also requires a URL to the application, namely the redirect URL which users’ browsers get redirected to on successful login. Icinga Web SSO automatically fills in the redirect URL, just copy it over. In my case, it’s “http://10.27.0.159/icingaweb2/sso/oidc/redirection-endpoint”.
While on it, see the pre-filled OAuth scopes in Icinga Web SSO and check each one on the identity provider side. At least in GitLab, they’re checkboxes. If any of the scopes Icinga Web SSO wants isn’t known to the identity provider at all, it’s fine. We automatically handle this on user login.
Apropos GitLab, if you actually use it, there’s nothing more to do and you can press “Save application” now. That will give you an application ID (e.g. 2685ae221d423fc72c6e53f944cf5a5e15cfeff8009b9d6f17012c6073d03828) and a secret (e.g. gloas-9f706a856422427f2c5494d244501ba2ec8e07689a0b14bc25d350d4468c8e9e) for copying into the Client ID/Secret fields of Icinga Web SSO. If you show the secret for demonstration purposes, don’t forget to reset it first!
Finally, make sure your username and groups fields match your identity provider’s documentation and the group mapping is enabled/disabled as you wish. Groups from the identity provider and from existing Icinga Web group backends apply to SSO users independently from each other. Both can be used equally by Icinga Web to apply roles.
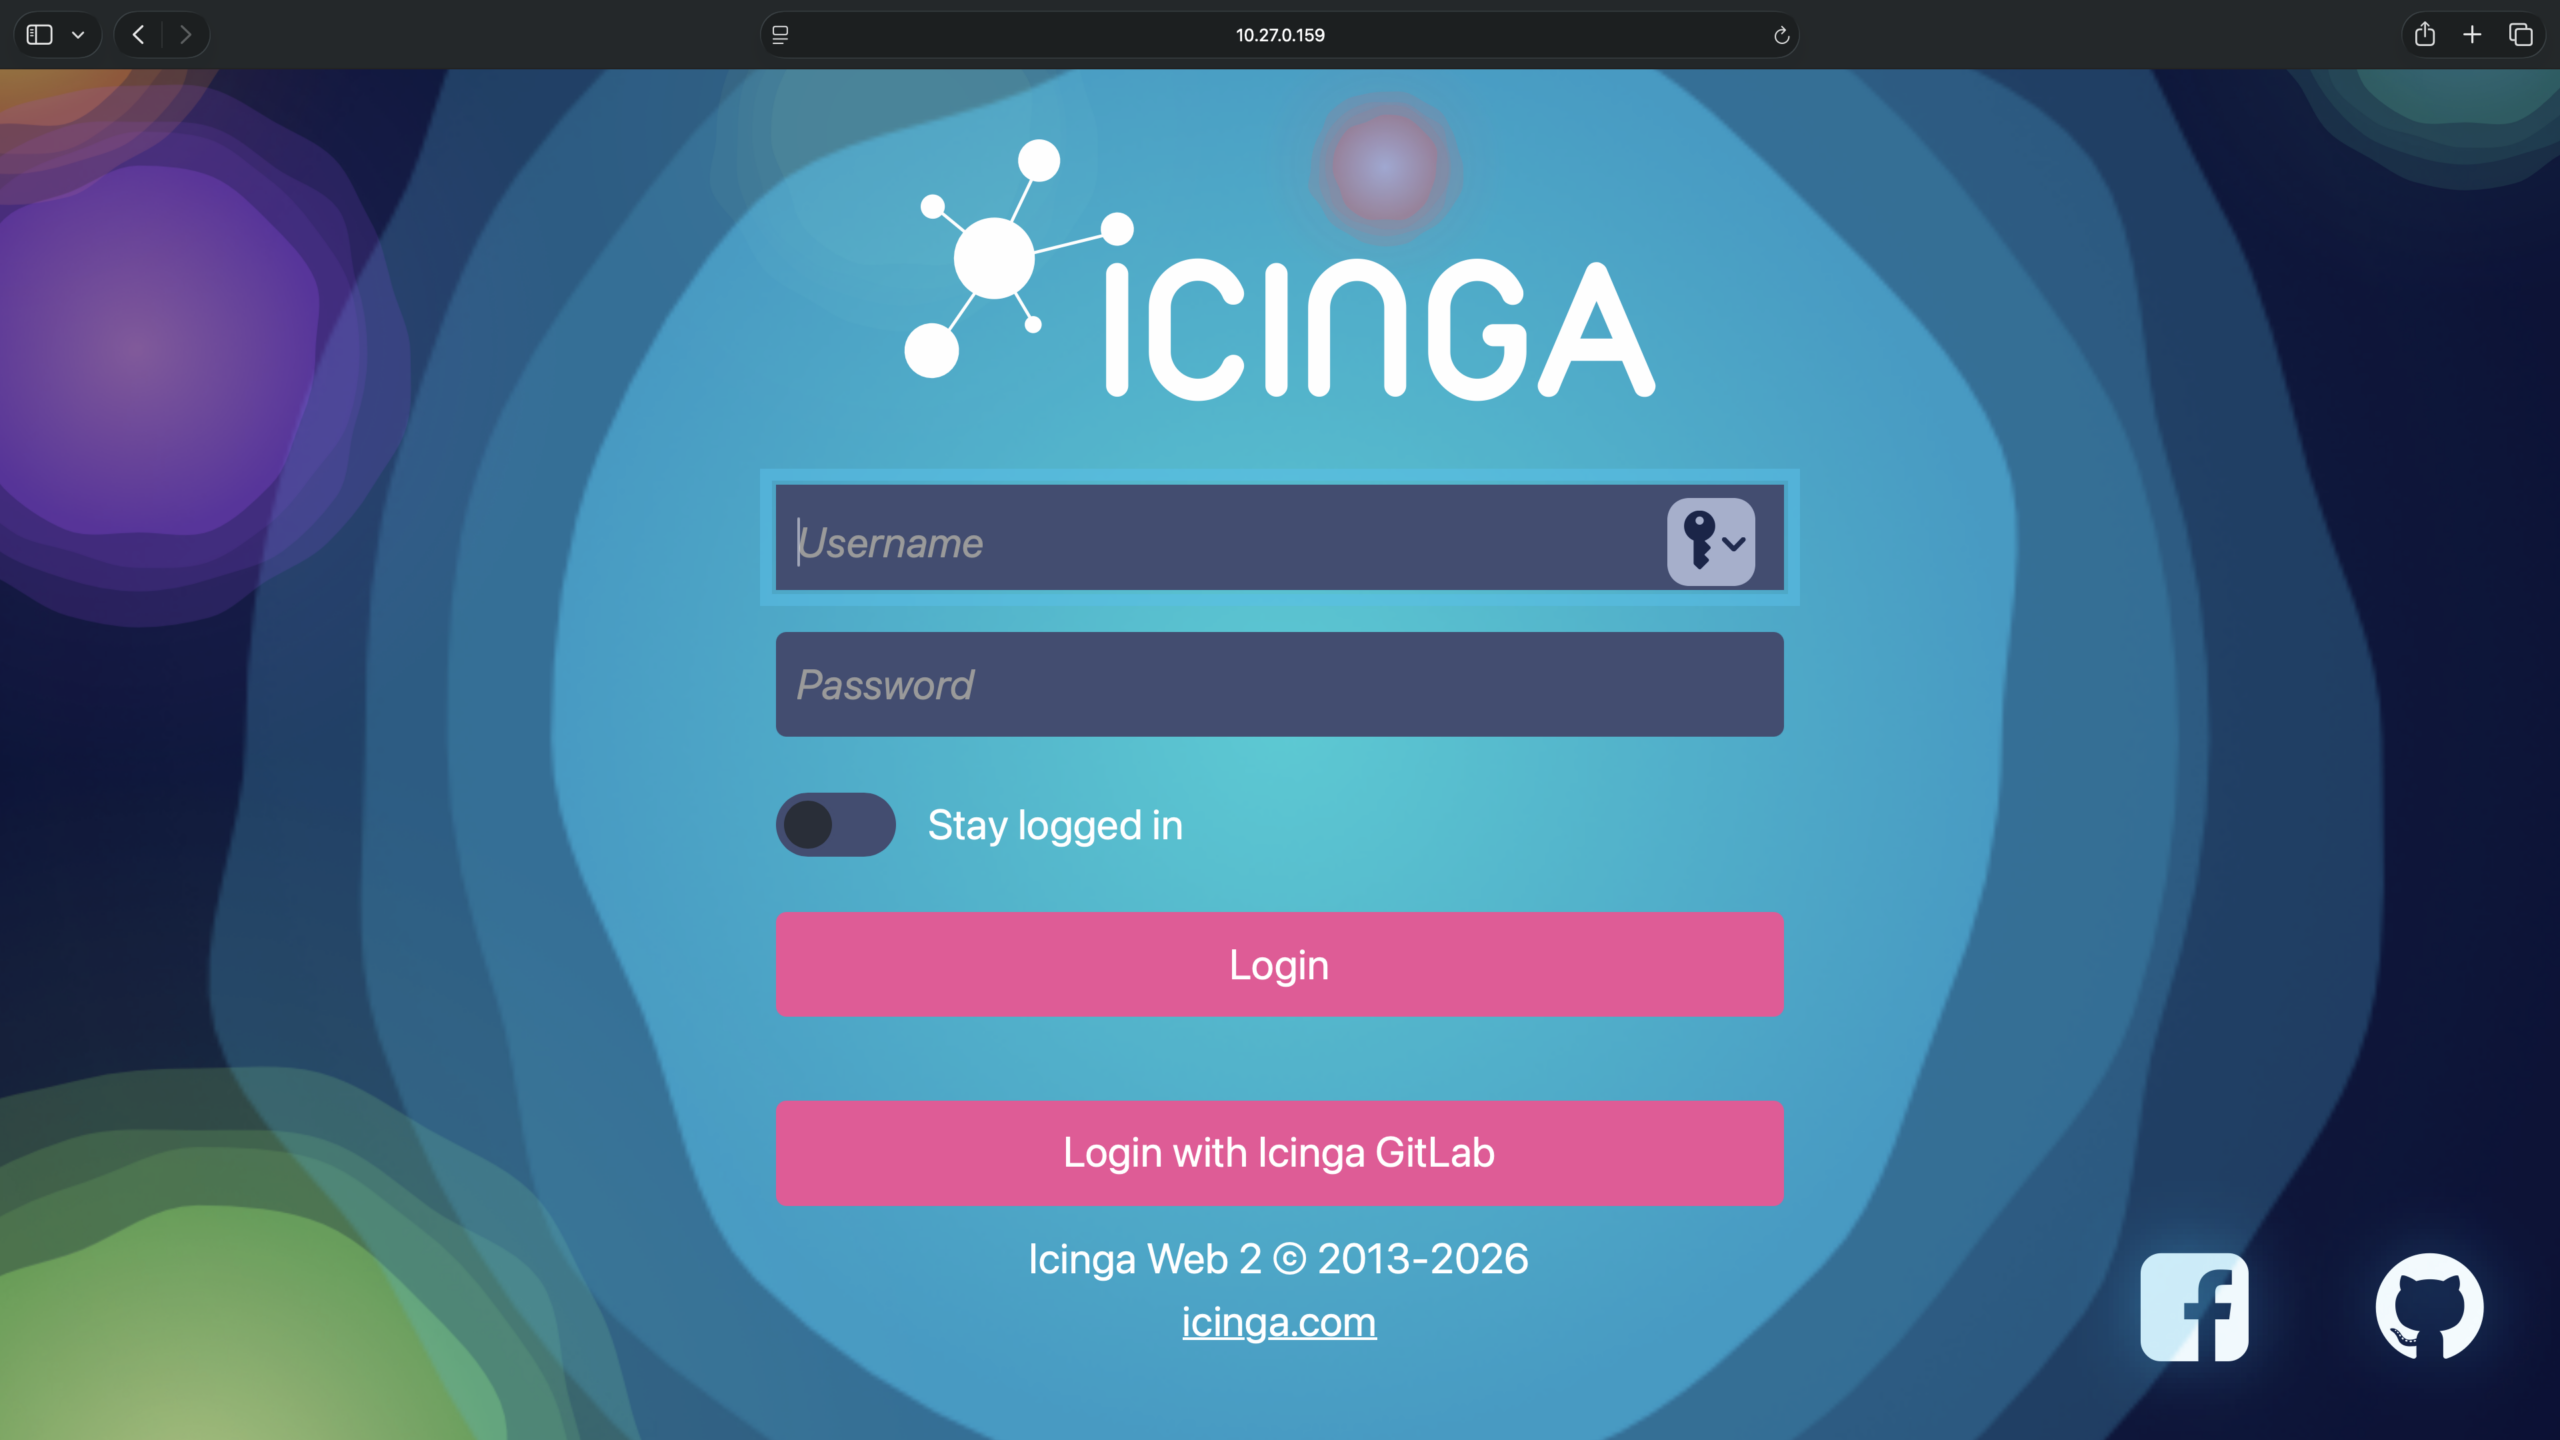
At this point, you can save the provider in Icinga Web SSO and a new button labeled “Login with Icinga GitLab” will appear on Icinga Web’s login page.
For the power users
Prefix user names
To automatically prepend a desired string to every user logged in with a specific provider, specify /^/ as Username Search Regex and your desired string as Username Search Replacement. The same works likewise for groups.
Suffix user names
To automatically append a desired string to every user logged in with a specific provider, specify /$/ as Username Search Regex and your desired string as Username Search Replacement.
Transform user names
As the form fields already say, we support any kind of search and replacement in both user and group names. Regex power users may even combine multiple transformations into one regular expression. Especially if you use an LLM to generate such, consult regex101.com before deploying to production.
Configure via Puppet/Ansible/NixOS
In my case, /etc/icingaweb2/modules/sso/providers.ini looks like this (6a50ca80616d8 is a random ID generated by Web SSO):
[6a7de31931925]
name = "Icinga GitLab"
base_url = "https://git.icinga.com/.well-known/openid-configuration"
client_id = "2685ae221d423fc72c6e53f944cf5a5e15cfeff8009b9d6f17012c6073d03828"
client_secret = "gloas-9f706a856422427f2c5494d244501ba2ec8e07689a0b14bc25d350d4468c8e9e"
scopes = "openid profile offline_access groups"
redirect_url = "http://10.27.0.159/icingaweb2/sso/oidc/redirection-endpoint"
username_claim = "preferred_username"
map_groups = "y"
groups_claim = "groups"
username_search = "/$/"
username_replace = "-gitlab"
groupname_search = "/^/"
groupname_replace = "gitlab-"
Restrict users to SSO
Admittedly you can’t remove the classic username/password login mask, but you can deactivate all user backends once Icinga Web SSO works well for you. But I personally would keep one local database backend with one admin user as a fallback. Just to be sure…