Icinga Notifications and Icinga Notifications Web just celebrated their first beta release. This post will try to help you getting started with Icinga Notifications by walking you through the interactive configuration, explaining both the underlying concepts and their actual effects.
First, to get an understanding of what Icinga Notifications does, please read both the mentioned blog post and the introduction from the manual carefully. In a nutshell, Icinga Notifications is a standalone component in the Icinga stack that receives events from various sources and acts upon them. It is not to be confused with the Icinga 2 Notifications, but a more general approach that is not tied to Icinga 2, with the goal of eventually making Icinga 2 Notifications obsolete.
Initial Setup
All you need is a current Icinga setup, which includes Icinga 2, Icinga DB, Icinga Web, and Icinga DB Web. Start with installing the two new components, begin with Icinga Notifications. The installation documentation of Icinga Notifications and Icinga Notifications Web should have you covered.
Then take some time to walk through the Configuration section of both manuals, Icinga Notifications and Icinga Notifications Web. Most users should only need to change the Database Configuration for Icinga Notifications. After enabling the Icinga Notifications Web module, the same database needs to be configured there as well.
Further Configuration in Icinga Notifications Web
When getting started with Icinga Notifications, understanding how sources and channels work is key to building a functional notification flow. While the Database configuration is easy to understand even without domain knowledge, the Channels and Sources configuration may require a few words. When thinking about Icinga Notifications, think of it as a factory: raw events come in on one side, polished notifications go out on the other. In this analogy, the sources are the suppliers of events and channels deliver the notification messages. More specifically, Icinga 2 is likely to be the most prominent source in the typical setup, delivering state changes and more. After Icinga Notifications decides to notify someone about such an event, it uses a channel to deliver that notification, e.g., via an email sending channel.
For the sake of this post, you might want to add your Icinga 2 as a source and configure one of the available channels.
Contact and Contact Groups
So far, the basics are now configured: Icinga Notifications and Icinga Notifications Web share state via the database and events can be consumed. The next step is to configure who gets notified and when. To do this, switch to Notifications in the side menu and click on Configuration.
Let’s start with the Contacts tab, where you can configure contacts with different addresses to receive notifications. At least one contact must be created with a configured default channel and, depending on the channel, with an address assigned to it. In most real-world situations, multiple contacts would be configured to represent the people working with the monitoring.
If the mere thought of manually creating all your users is tedious, do not worry, an API to automate this is already in the pipeline. This API should cover not only contacts, but also contact groups.
Speaking of which, head over to the Contact Groups tab. A contact group is a set of contacts, allowing to notify each and everyone of them at once. This could be, for example, your on-call team. If your team is smaller or you are the only Icinga user, feel free to ignore contact groups.
Event Rules and Schedules
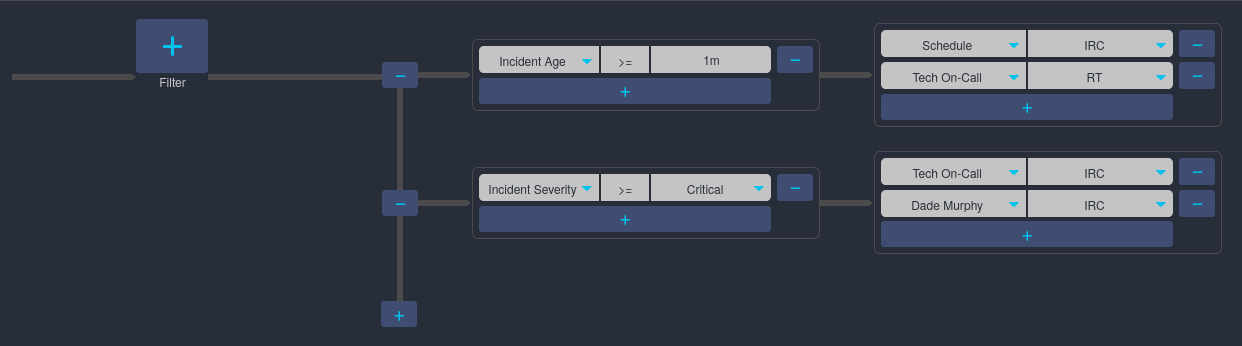
After defining contacts, go to Event Rules to specify when those are getting notified. Start with a new event rule and take a moment to grasp the configuration options.
On the left hand side, filters on event tags can be defined. This restricts which events should be handled by this rule. Unless you are defining multiple rules or want to exclude some specific events, you can ignore filters for the time being.
After the filter, multiple branches are possible, each starting with a condition to be met. While filters act on tags in the event itself, conditions restrict processing based on the event’s incident.
At this point, a brief interjection may be necessary. While Icinga Notifications acts on events generated by its sources, these events are internally be assigned to incidents. Typically, when a service is experiencing problems, there may be multiple events indicating different state changes. Since all these events refer to the same object, they can be grouped together as an incident. For a concrete example, a machine might be under a lot of stress, resulting in a rising load, first hitting the warning level, then the critical level, bouncing between those boundaries until it goes back to normal.
Going back to the event rule conditions, they allow further filtering based on the incident, such as its age or severity. Unlike the previous filter, a condition does not limit if something will generate a notification, but when.
Finally, the recipients can be selected on the right side. These can be individual contacts or contact groups where each member is notified. Furthermore, a schedule can also be a recipient.
So, what is now a schedule? Go to the Schedules tab to find out!
In most larger setups, or especially in corporate environments, there is not a single contact responsible for the monitoring, but an on-call rotation. For example, there might be a daily on-call rotation between some system administrators, a nightly on-call rotation between other administrators and a fallback, just in case.
A schedule allows you to build this by creating multiple rotations that shadow each other, with the last rotation taking precedence. The recipient of each schedule rotation might either be single contacts or contact groups, where again each member gets notified.

Inspecting What Is Going On
While this has been quite a ride, it should have shown you just how flexible Icinga Notifications can be, and we have not even touched all of it yet. However, with all these options, there is a chance that some things might not work exactly the way you expects them to do. Let’s take a look at what Icinga Notifications reports.
At the surface level, Icinga Notifications Web lists events and incidents, accessible through the menu items of equal name. When inspecting an event, its incident and related object are directly linked. The incident itself also displays its history.
But sometimes you need to dig deeper. Icinga Notifications logs what it does with reasons and details. Depending on your installation, the logs may be in different places, but package installations log to journald. Note that some details are part of the journal fields and are not shown by default. By using a more verbose --output mode, journalctl will show them.
journalctl --unit icinga-notifications.service --output verbose
All Icinga Notifications fields are prefixed with ICINGA_NOTIFICATIONS_. Furthermore, you should consider incrementing Icinga Notifications log level in the configuration.
Outlook
Since Icinga Notifications is still in beta, changes are expected. You can help us along the way by giving it a test drive and evaluating how it works on your setup. Of course, feel free to report bugs, feature requests, or any unexpected behavior to either the Icinga Notifications or Icinga Notifications Web issue tracker. In this early stage, you can help to shape the future of notifications in the Icinga stack.