When building Icinga DB Web we completely rewrote the basic Icinga Web UI. The “monitoring module”, which it was called before.
While this existed for some time and the and the underlying concepts were already used in the Icinga Director, we took the chance and brought our Web UI to a new level.
These are the basic concepts
In Icinga IPL every UI element is represented by a PHP class. Besides the logic for handling data, all IPL components feature an assemble() method, where the markup for the UI is put together and then later rendered as HTML. Components can use other IPL components as well.
This offers developers the following advantages.
- more object oriented approach to building UI
- consolidated look and feel of UI elements
- more control over single elements
- default UI areas, such as the controls area and the status bar can be filled with elements.
- every IPL component can be used throughout Icinga Web
- you can use IPL to build components for your own modules more quickly and efficiently
- updated functionality for IPL components
How the new Host List is built
HostsController
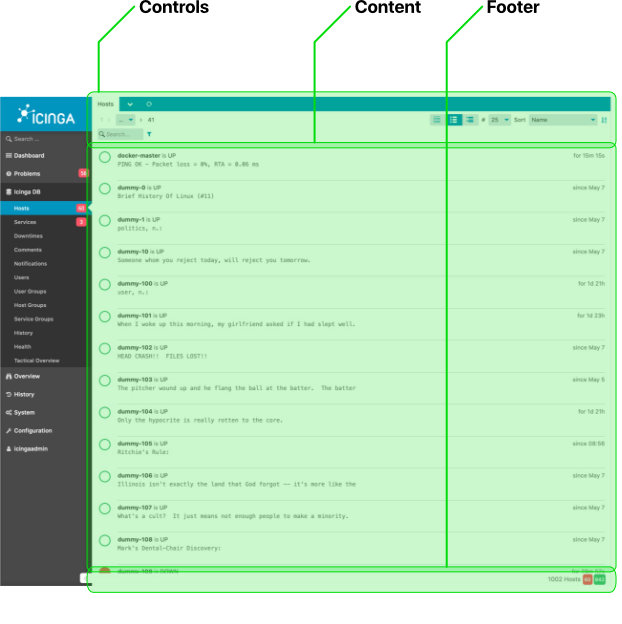
Throughout Icinga Web there are basic UI areas, that can be filled with components:
- Controls
- Content
- Footer
indexAction()
The HostsController features the indexAction() for displaying the hosts list. In this method, the data is set up and passed to the respective IPL components. The created IPL components are then added to the specific areas of the view.
Lets have a look at the code
First the title of the view is set. With the variable $db a new database connection is created. After that the host items are retrieved from the database.
$this->setTitle(t('Hosts'));
$compact = $this->view->compact;
$db = $this->getDb();
$hosts = Host::on($db)->with('state');
…
Afterwards the single control components are set up.
$limitControl = $this->createLimitControl();
$paginationControl = $this->createPaginationControl($hosts);
$sortControl = $this->createSortControl(
    $hosts,
    [ … ]
);
$viewModeSwitcher = $this->createViewModeSwitcher();
$filterControl = $this->createFilterControl($hosts);
And then added to the control area of the view.
$this->addControl($paginationControl);
$this->addControl($sortControl);
$this->addControl($limitControl);
$this->addControl($viewModeSwitcher);
$this->addControl($filterControl);
$this->addControl(new ContinueWith($this->getFilter(), Links::hostsDetails()));
The HostList object is created and gets passed the results of the hosts items from the database.
$results = $hosts->execute();
$hostList = (new HostList($results))
    ->setViewMode($viewModeSwitcher->getViewMode());
$this->addContent($hostList);
HostList
Now let’s see how the HostList is created. It’s a child class of StateList, which is also a child class of BaseItemList. The latter features the `assemble` method, which is used in the HostList.
assemble()
The assemble() method is where the markup is rendered. If one component is using other components, they can be created and added here as well.
protected function getItemClass()
{
    switch ($this->getViewMode()) {
        case 'minimal':
            return HostListItemMinimal::class;
        case 'detailed':
            return HostListItemDetailed::class;
        default:
            return HostListItem::class;
    }
}
Depending on the view mode, we have different item classes for the Host List to use. This is determined in the getItemClass() method.
Depending on the view mode the actual host list items are created and then added to the view.
foreach ($this->data as $data) {
/** @var BaseListItem|BaseTableRowItem $item */
    $item = new $itemClass($data, $this);
    $this->add($item);
}
if ($this->isEmpty()) {
    $this->setTag('div');
    $this->add(new EmptyState(t('No items found.')));
}
Have a look at the code
You can clone the Icinga DB Web repository from GitHub. Go here


