In a previous article, Julian provided a comprehensive overview of the characteristics and functionality of Incidents in Icinga Notifications. In today’s blog, I will explain the concept of Incident muting and its underlying mechanisms.
What is Incident Muting?
The term Incident muting is used to describe the practice of temporarily silencing notifications that are related to a specific incident or issue. This approach enables you to concentrate on resolution without being distracted by an excessive number of notifications. By silencing low-priority notifications, you can optimise the temporal and organisational utilisation of your resources, guaranteeing that the most crucial problems are addressed with immediate efficacy.
How does it work in Icinga Notifications?
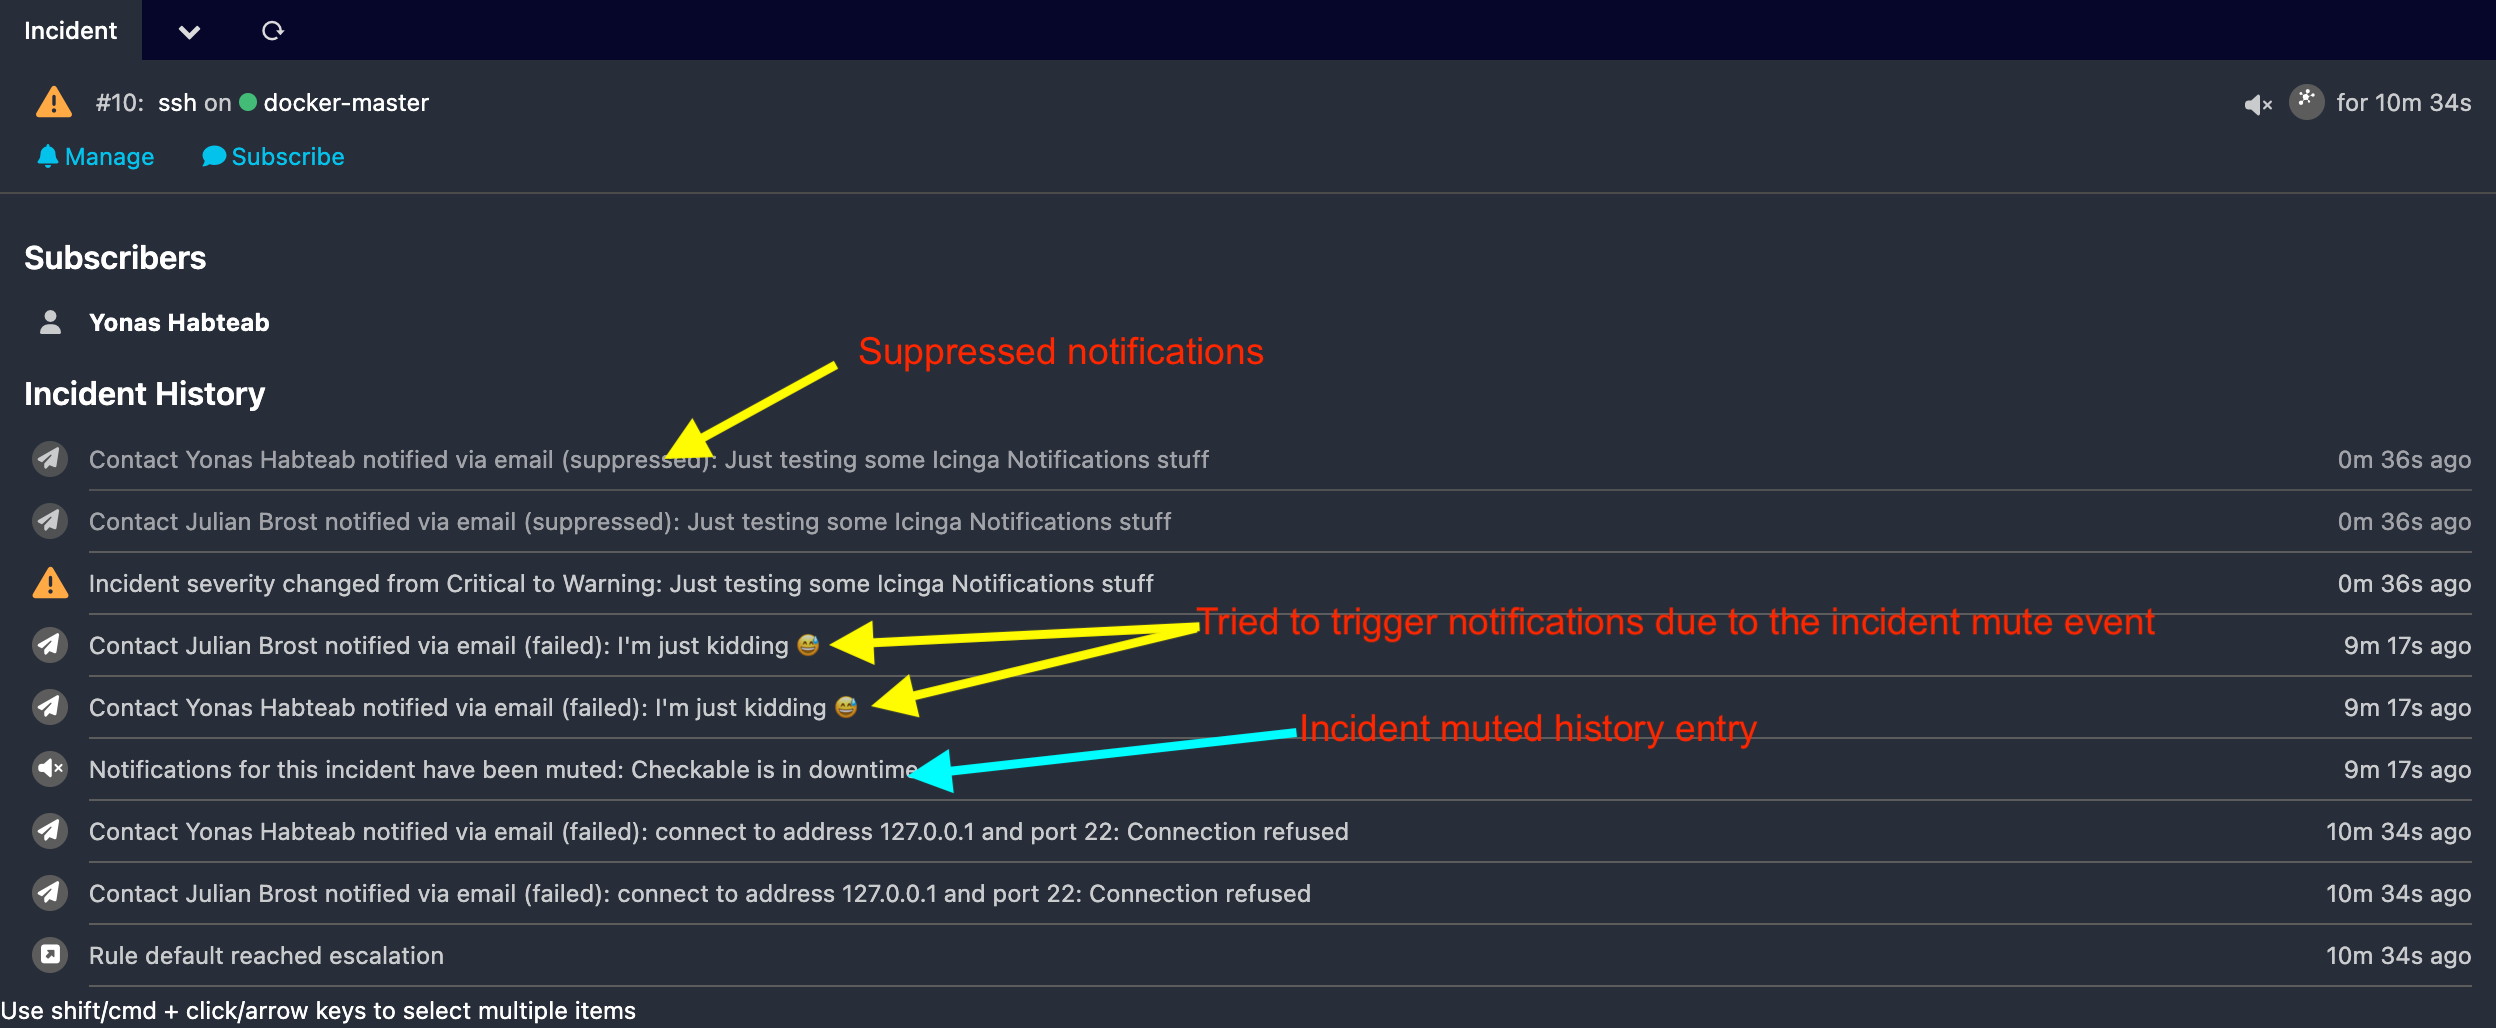
The incident muting process in Icinga Notifications consists of several key steps. Initially, for all your objects managed by Icinga 2, you can create a downtime or acknowledge their problem states. Icinga Notifications then automatically retrieves these events, resulting in the corresponding object being muted within Icinga Notifications as well. When there’s an active incident for the respective object when such events occur, Icinga Notifications will issue a final notification before the incident is fully muted. Additionally, it generates an incident history entry of the muting reason, visible in the incident detail view, typically reflecting either the downtime or acknowledgment event from Icinga 2. Once you mute an incident, Icinga Notifications will stop sending further notifications. However, it will continue to generate historical data, which you can access and review at any time via the respective incident detail views. In Icinga Notifications Web, you’ll see a corresponding indicator labeled “suppressed” for any suppressed notifications, allowing you to visually distinguish them from other entries.
Incident muting without Icinga 2
The aforementioned examples all rely on the Icinga 2 events and wondering how you can mute an Incident without Icinga 2 🤔? Well, you can likewise mute incidents and objects even without an Icinga 2 instance. In order to accomplish this, you simply need to submit a POST request with either the mute: true or type: "mute" field set in the request body, to the process-event HTTP endpoint. The two attributes are mutually inclusive, meaning setting either one implicitly sets the other. However, it is important to note that you must also set the mute_reason field for such custom mute events, as this is a mandatory field if you set either of the aforementioned event attributes.
curl -v -u 'source-1:icinga' -d '@-' 'http://localhost:5680/process-event' <<EOF
{
"name": "notifications",
"url": "https://yonas.icinga.com/icingaweb2/icingadb/host?name=notifications",
"tags": {
"host": "notifications"
},
"type": "state",
"severity": "crit",
"mute": true,
"username": "yhabteab",
"message": "Something went somewhere very wrong.",
"mute_reason": "Something went somewhere very wrong."
}
EOF
This is how the outcome appears in Icinga Notifications Web. Keep in mind that the object is not managed by Icinga 2, so you will not see any links to Icinga DB Web.
How to unmute Incidents?
mute: false or the type: "unmute" field set to the process-event endpoint. If the incident or object was muted due to an Icinga 2 downtime, acknowledgment or flapping event, Icinga Notifications will automatically unmute the incident, when the downtime expires and the acknowledgement is cleared, or if the object’s flapping state ends. However, it is important to note that the incident or object will not be unmuted, for instance, when a downtime expires, and there’s still an acknowledgment set or the object is in a flapping state. In such cases, the incident or object will stay muted until the acknowledgment is cleared and the object is no longer flapping.


