Install Icinga 2 on Amazon Linux
Add Icinga Package Repository 
We recommend using our official repositories.
All the following commands should be executed as the root user.
As pipes and nested commands are used, it is recommended to switch to a root user session, e.g., using sudo -i.
Here’s how to add it to your system:
Amazon Linux Repository 
Info
A paid repository subscription is required for Amazon Linux repositories. Get more information on icinga.com/subscription
Don’t forget to fill in the username and password section with your credentials in the local .repo file.
wget https://packages.icinga.com/subscription/amazon/ICINGA-release.repo -O /etc/yum.repos.d/ICINGA-release.repo
Install Icinga 2 
You can install Icinga 2 by using your distribution’s package manager
to install the icinga2 package. The following commands must be executed
with root permissions unless noted otherwise.
Tip
If you have SELinux enabled, the package icinga2-selinux is also required.
yum install icinga2
systemctl enable icinga2
systemctl start icinga2
Systemd Service 
The majority of supported distributions use systemd. The Icinga 2 packages automatically install the necessary systemd unit files.
If you’re stuck with configuration errors, you can manually invoke the configuration validation.
icinga2 daemon -C
Tip
If you are running into fork errors with systemd enabled distributions, please check the troubleshooting chapter.
Set up Check Plugins 
Without plugins Icinga 2 does not know how to check external services. The Monitoring Plugins Project provides an extensive set of plugins which can be used with Icinga 2 to check whether services are working properly.
These plugins are required to make the example configuration work out-of-the-box.
Depending on which directory your plugins are installed into you may need to
update the global PluginDir constant in your Icinga 2 configuration.
This constant is used by the check command definitions contained in the Icinga Template Library
to determine where to find the plugin binaries.
Tip
Please refer to the service monitoring chapter for details about how to integrate additional check plugins into your Icinga 2 setup.
Unfortunately newer versions of Amazon Linux don’t provide those plugins, yet.
Set up Icinga 2 API 
Almost every Icinga 2 setup requires the Icinga 2 API as Icinga Web connects to it, Icinga DB requires it, and it enables cluster communication functionality for highly available and distributed setups.
Info
If you set up a highly available and/or distributed Icinga monitoring environment, please read the Distributed Monitoring chapter as the commands to set up the API are different from setting up a single node setup.
See the API chapter for details, or follow the steps below to set up the API quickly:
Run the following command to:
- enable the
apifeature, - set up certificates, and
- add the API user
rootwith an auto-generated password in the configuration file/etc/icinga2/conf.d/api-users.conf.
icinga2 api setup
For new installations, it is recommended to set the following additional attribute inside the ApiListener object
definition in /etc/icinga2/features-enabled/api.conf. This will already enforce stricter permissions as they will
become the default with v2.17 (see the upgrading documentation for the
version that introduced that setting for more details):
enforce_filter_expression_permission = true
Restart Icinga 2 for these changes to take effect.
systemctl restart icinga2
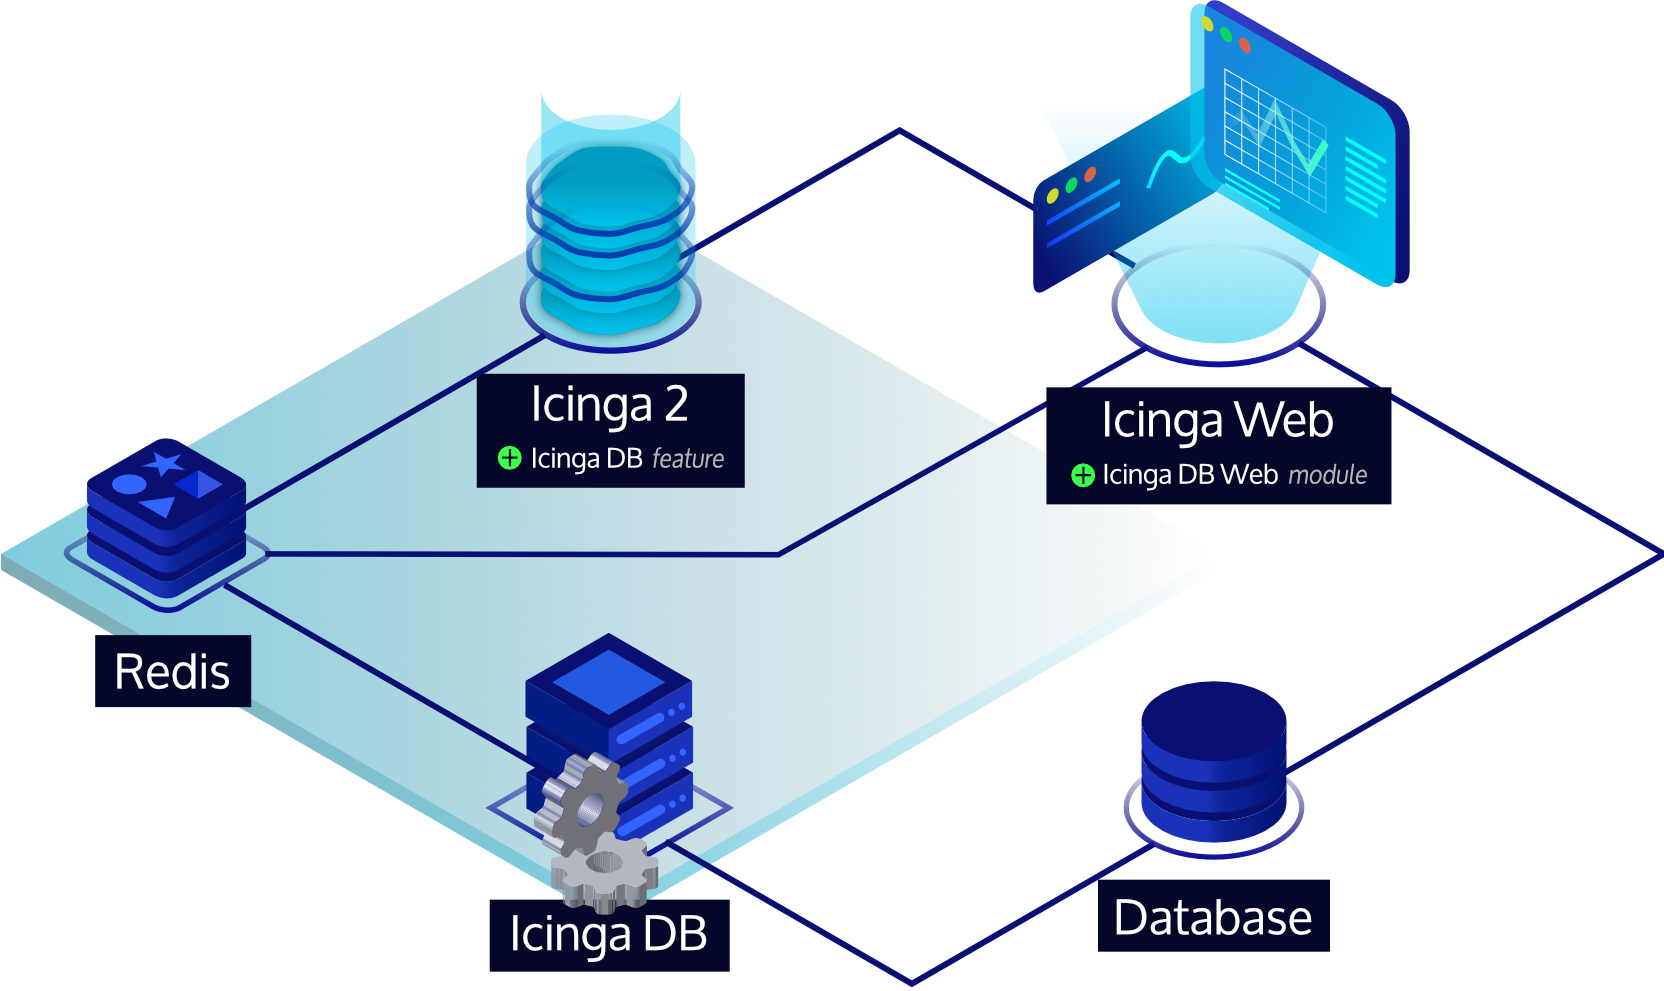
Set up Icinga DB 
Icinga DB is a set of components for publishing, synchronizing and visualizing monitoring data in the Icinga ecosystem, consisting of:
- Icinga 2 with its
icingadbfeature enabled, responsible for publishing monitoring data to a Redis server, i.e. configuration and its runtime updates, check results, state changes, downtimes, acknowledgements, notifications, and other events such as flapping - The Icinga DB daemon, which synchronizes the data between the Redis server and a database
- And Icinga Web with the Icinga DB Web module enabled, which connects to both Redis and the database to display and work with the most up-to-date data
Info
Setting up Icinga 2’s Icinga DB feature is only required for Icinga 2 master nodes or single-node setups.
Set up Redis Server 
A Redis server from version 6.2 is required.
Info
This guide sets up the icingadb-redis package provided by Icinga,
which ships a current Redis Server version and is preconfigured for the Icinga DB components.
Using own Redis server setups is supported as long as the version requirements are met.
Tip
Although the Redis server can run anywhere in an Icinga environment, we recommend to install it where the corresponding Icinga 2 node is running to keep latency between the components low.
Install Icinga DB Redis Package 
Use your distribution’s package manager to install the icingadb-redis package.
Tip
If you have SELinux enabled, the package icingadb-redis-selinux is also required.
yum install icingadb-redis
Run Icinga DB Redis 
The icingadb-redis package automatically installs the necessary systemd unit files to run Icinga DB Redis.
Please run the following command to enable and start its service:
systemctl enable --now icingadb-redis
Enable Remote Redis Connections 
By default, icingadb-redis only listens on 127.0.0.1. If Icinga Web or Icinga 2 is running on another node,
remote access to the Redis server must be allowed. This requires the following directives to be set in
the /etc/icingadb-redis/icingadb-redis.conf configuration file:
- Set
protected-modetono, i.e.protected-mode no - Set
bindto the desired binding interface or bind all interfaces, e.g.bind 0.0.0.0
Warning
By default, Redis has no authentication preventing others from accessing it. When opening Redis to an external interface, make sure to set a password, set up appropriate firewall rules, or configure TLS with certificate authentication on Redis and its consumers, i.e. Icinga 2, Icinga DB and Icinga Web.
Restart Icinga DB Redis for these changes to take effect:
systemctl restart icingadb-redis
Enable Icinga DB Feature 
With the Icinga DB feature enabled, Icinga 2 publishes all of its monitoring data to the Redis server. This includes configuration and its runtime updates via the Icinga 2 API, check results, state changes, downtimes, acknowledgments, notifications and other events such as flapping.
Icinga 2 installs the feature configuration file to /etc/icinga2/features-available/icingadb.conf,
pre-configured for a local setup.
Update this file in case Redis is running on a different host or to set credentials.
All available settings are explained in the Icinga DB object chapter.
Important
For single-node and high-availability setups, please read the note about the environment ID, which is common to all Icinga DB components and generated by the Icinga DB feature.
To enable the icingadb feature use the following command:
icinga2 feature enable icingadb
Restart Icinga 2 for these changes to take effect:
systemctl restart icinga2
Install Icinga DB Daemon 
After installing Icinga 2, setting up a Redis server and enabling the icingadb feature,
the Icinga DB daemon that synchronizes monitoring data between the Redis server and a database is now set up.

Tip
Although the Icinga DB daemon can run anywhere in an Icinga environment, we recommend to install it where the corresponding Icinga 2 node and Redis server is running to keep latency between the components low.
The Icinga DB daemon package is also included in the Icinga repository, and since it is already set up, you have completed the instructions here and can proceed to install the Icinga DB daemon on Amazon Linux, which will also guide you through the setup of the database and Icinga DB Web.
Backup 
Ensure to include the following in your backups:
- Configuration files in
/etc/icinga2 - Certificate files in
/var/lib/icinga2/ca(Master CA key pair) and/var/lib/icinga2/certs(node certificates) - Runtime files in
/var/lib/icinga2